Showing posts with label holidays. Show all posts

Tuesday, April 3, 2012

From Passover to Kitchen Disasters

This post veers from left to right and backwards and forward, so bear with me.

Some friends invited us to their Seder this Friday and I am so excited, this is my second Seder in 15 years and I love them. I don't follow any particular religion, but I enjoy learning about other religions and wouldn't mind it if my kids gleaned something from these experiences because they won't be getting anything from me, sadly.

While our friends are very open and honest about the fact that they are a bit lazy when it comes to the details (the husband is Jewish and the wife is Catholic), they still want their children to appreciate the meaning behind the holiday.

I wanted to bring a dish that was appropriate as well as kid friendly and I immediately thought to ask Jenny Rosenstrach if she had any dish suggestions. She was kind enough to send this one to me.

We meet again, Toffee

Pretty, right? Well, I have to admit that my heart skipped a beat when I saw it... and not in a good way. I have a PTSD thing going on with making toffee after a pretty disastrous attempt on my behalf about 15 years ago - the same year as my first Seder. Whoa! This idea is sounding bad already - do you think history can repeat itself? 

Fifteen years ago a work colleague asked if I would cat sit for her while she and her husband traveled to New York for the holidays. They owned a beautiful flat in Nob Hill which featured a newly remodeled kitchen. Coming from my dinky two bedroom apartment that I shared with a roommate in the Richmond District, this place was like the Taj Mahal. But then when I saw the kitchen, the Rolodex in my head started to spin with recipes that I just had to make in that kitchen.

Their kitchen featured a new wooden floor, a Viking stove, gorgeous gray marble countertops with brand new appliances from their recent wedding. I am pretty sure the tags has been taken off the stove about three weeks prior to my arrival. After they left for their flight, I pulled out my a Williams-Sonoma cookbook that I brought with me and decided to make chocolate toffee for Christmas presents. I imagined myself wearing a clean white apron, bopping along to music on the stereo while happily bagging treats all day. I had plans that night to meet some friends at the Red Room (RIP).


As I read through the recipe, I realized that I didn't have a candy thermometer. "Meh," I thought, "It doesn't seem like that big of a big deal. Rather fussy if you ask me," I said to myself. I knew how to bake for god's sake, so making candy seemed the same. I mean, how hard could it be, really?

I got to work and as the sugar started to boil, I watched it like a hawk trying to figure out what they meant by the color description "Honey Amber." It went from the color of honey to dark brown so fast that I grabbed an oven mitt and the pan and poured the boiling sugar onto a buttered cookie sheet that I had placed on the counter. The heat from the toffee warped the cookie sheet and it tipped over onto the new stove and quickly oozed its way into the burners and down the new cabinets, spilling onto the new floor. I freaked out and  screamed dropped the pan of boiling sugar and it crashed to the floor, splattering burnt sugar all over the kitchen (fortunately I was spared). I didn't need a candy thermometer to know that the sugar had hit the hard ball stage by the time it reached the floor because I could not get it off.

Sobbing from this potentially expensive mistake, I started soaking some of their beautiful new dishtowels from their wedding in hot water and slowly sponged the toffee off bit by bit. I spent the next six hours working my way around the kitchen, picking, sponging and pulling toffee out of areas I didn't know it could reach - under the fridge, behind the toaster, inside the stove burners, it was everywhere! After that I ordered take out and cancelled plans with my friends at the Red Room. I just sat there, stunned from the days events and watched the cat and counted the hours till they came home. Fortunately the only items I had to replace were the pot, the cookie sheet and some dishtowels.

Needless to say toffee and I don't have a good relationship.

In case I have a panic attack prior to making the matzo toffee, I offered to make Matzo s'mores as well. Surely I'll win Dinner Guest of the Year if I bring fire, sharp pointy sticks and gooey marshmallows for small children to play with. I can just see our invitation being revoked for next year.

For Easter we are sticking to the favorites: Baked ham, asparagus, rolls and deviled eggs. Who says I am not a stickler for traditions?

Thursday, March 15, 2012

Hash Leftovers A Go Go

Prepping the cabbage
We may have exhausted our corned beef quota for the season, but there is only one way (in my opinion) to use up the leftovers - Corned Beef Hash. I had a sneaking suspicion this would be a hit because my kids have never met a salted, cured meat they didn't like.

There are a zillion ways to make this dish, but I simply sauteed a small chopped onion and one diced red bell pepper in about two tablespoon of canola oil till soft. Then I added two cups of chopped corned beef, two cups chopped roasted cabbage and two cups diced cooked potatoes and let it warm through, browning and crisping the potatoes along the way. The adults fried an egg and plopped it on top of their bowls, but the kids inhaled theirs with a side of When Will You Be Making This Again?


Saturday, February 11, 2012

Tutorial: Shrinky Dink Necklaces for Valentine's Day


I never was much of a fan of the holiday/craft thing till I had kids and now I feel like I am making up for lost time. My son was interested in making something for Valentine's Day this year, but candy is not allowed at his school. A few days later a co-worker and I were talking about creative Valentine's Day cards and she told me about how she and her daughter (this was back in the 90s) used Shrinky Dinks to make name plates for the children to put on little handmade satchel bags one year. The Shrinky Dink idea stuck with me and when I mentioned it to my son, he was all over it. Mainly because it involved using the oven and an oven mitt. But instead of name plates, we decided on making necklaces for his classmates. Below is a short tutorial on how we made Shrinky Dink Valentine's Day Necklaces for my son's first grade classmates.


Shrinky Dink Valentine's Day Necklaces
Makes 35 necklaces


Here is what you need:

1 package (6 plain sheets) of Shrinky Dink paper
A hole punch
Sharpie markers in a variety of colors
Necklace string (you could use yarn or even embroidery thread)


Have your child draw all over the sheets of Shrinky Dink paper with the Sharpie markers. This took us a few days since my son lost interest pretty quickly with drawing. I didn't want to prod him too much with the drawing, so he did a variety of rainbows, stars, smiley faces, squiggly lines and lots of hearts with arrows.


I cut a heart out of an index card measuring 2-1/4" across the widest part to use as a template. You can play around with the size of the heart, since the Shrinky Dink will... wait for it... shrink quite a bit. Our hearts shrunk down to 1 inch after it was baked. Carefully cut out the Shrinky Dink hearts.


Put a hole punch in the heart, but not too close to the edge. If the hole is too close to the edge then it will crack like an egg. I wrote out each child's name on the heart to personalize it a little bit.

Heat the oven to 350 degrees and have your foil covered cookie sheet in the oven while it warms. You want the cookie sheet to be hot when you are ready to bake the Shrinky Dinks. Place the cut-out hearts on the cookie sheet in the oven quickly. Make sure to turn the inner oven light on so your kids can watch the Shrinky Dinks do their magic. This was by far the best part of the whole process for my kids.

When the Shrinky Dinks stop moving and flatten out - usually within one minute - take the cookie sheet out of the oven and let them cool off. If any were a little lumpy when they first came out then I used my oven glove to gently press down and flatten them out. If they are not done yet or look a little wonky, then you can put the sheet back in the oven and they will flatten out.

Lace the necklace string through the hole punch and, Viola! You have just made a totally cute handmade Shrinky Dink Valentine Necklace!

I cut 4x4 cards from some cheap-o card stock paper we got on clearance from Michael's and my son signed the cards.

Other cool Shrinky Dink tutorials:

Saturday, December 31, 2011

Resolutions


Only a few resolutions have been tugging at my brain this year and they are hardly lofty goals. But sometimes a resolution, or what I prefer to call lifestyle change, is what I need to kickstart something I've been meaning to do.

I loved Mighty Girl's resolutions (though I already have the donut one covered. Check!).

1) Read
 I need to read more books even if it means downloading them onto my iPod and listening to them while on the train to and from work. My inner multi tasker hopes that I can knit a few cowls for friends during this time. I gave up knitting about three years ago when sewing became more about instant gratification for me. But it would be nice to do something with all that yarn I have stashed around the house.

2) Find my Inner Fun Mom again
I remember when my son turned three years old, a new world opened up to me: He dropped the nap, became potty trained and suddenly I didn't have to carry a diaper bag around anymore. With that baggage suddenly off my shoulders, a new world opened up to me. I rediscovered sewing, a new exercise regime and our dinner choices opened up thanks to a stand off at the dinner table. If Stella got her groove back with a new boyfriend, then it's safe to say that I got my groove back when I stopped buying diapers at Costco.

In 2012 my daughter turns three. Let the groovy fun adventures begin! 

3) Compliment friends and strangers
At the gym I ran into a woman that I hadn't seen in about six months. Last time I saw her she had a really hard time keeping up with the group in our Bootcamp class and she never came back to class. When I saw her today her body had completely transformed and I did a double take when I walked past her. I walked back and told her she looked amazing and to keep doing what she doing, because she looked great. She beamed from ear to ear with pride and was delighted that people noticed her hard work.

A few hours later, I was at a park when a woman approached me to tell me she loved my new purse. I showed her all the pockets and the bells and whistles and she loved it so much that she took a picture of it so her husband would know exactly which one to give her for her birthday. She said, "You wear it so well, it made me want one!" I was buzzing with pride all day long from her compliment.

New Years Resolution #3: Compliment people. It pays itself forward every time.


4) Send birthday cards
I love receiving mail and this year I noticed how many people are not sending holiday cards anymore. I resolve to send birthday cards to friends and family in the mail. I want to keep up the old fashioned lines of communication with a cup and a string... not texting.

5) Continue the meal planning
This is a cheater resolution for me since I do it without thinking, but it's good to remind to myself that our family seemingly thrives on a menu for the week. I tried to loosen up the meal planning reigns over the holiday by winging it every night and it felt awful. I hate not knowing what I am going to be making for dinner. For some it's a fun thing to create a meal out of what they have in the fridge, but for me it's paralyzing. I need a plan. Period.

I think five resolutions is enough for now. Just enough to stoke the fires of creativity in me and keep a positive outlook for the year. May 2012 be full of light, happiness and joy for us all.

Wednesday, December 21, 2011

Extreme Cookie Edition

A few weeks ago I was craving Christmas cookies, so I went through my books, magazines and clips of recipes trying to find the right ones to bake and the choices were overwhelming: Thumbprints, bar cookies, sugar cookies, tassies, drop cookies, coconut, marshmallow, chocolate, pecans... the list went on. In order to have all the cookies that I wanted it was clear to me that I'd have to host a cookie exchange. But not just a regular cookie exchange. No... I just couldn't keep it simple.

I thought it'd be fun to host a cookie decorating party for my kids and their friends... and their siblings... and their mothers who would bring homemade cookies with them for the exchange. Five mothers and ten children ranging in ages from 12 weeks to nearly seven years old. This had potential disaster written all over it.

The week before the party I made the dough from this recipe, part of a feature on how to host a cookie decorating party with children. I have been hanging on to this article for seven years. Now why do you think I thought this sounded like a good idea back then? Because I didn't have kids back then, that's why.

Don't you love getting a glimpse of what an unrealistic person you were before you had kids?

The day before the party I baked over 80 sugar and gingerbread cookies as well as a double batch of  Chocolate Espresso Crinkle cookies for the exchange on the morning of the party. I covered our dining room table with a disposable tablecloth and gave each child their own tin tray with sprinkles in cupcake liners and a Ziploc bag filled with royal icing.


This was the best idea of the party - the disposable trays. I put the sprinkles in mini cupcake liners so it would provide containment and quantity control with how much the kids could dump onto a cookie. I had visions of fist fights breaking out over sprinkle containers, so by giving everyone their own supplies, I think I eliminated a lot of potential tears. I thought of this myself and will be patting myself on the back for it for the next year.


The Swedish Ginger Cookie recipe was alright, but it was not nearly as sweet as I had hoped. However, it bakes up nicely and when decorated with icing, the kids loved it.

The Sugar Cookie Cutouts recipe was very good and is one that I would definitely make again. (Please don't tell this to my family who regards my grandmother's butter cookie recipe as if it were legend.)

I really appreciated the tips in this article about hosting a party. I'll show before and after pictures below, but the author's advice was on the money: Make more frosting than you think you'll need, because kids will pile that stuff on. I had back up canisters of store bought frosting and the younger children ended up using these because royal icing is stiff and can be tricky to squeeze out. Only trouble is that canned frosting, or any buttercream frosting for that matter, will not harden.

I prepared myself for the mother of all messes and just let it happen. One sweep of the vacuum cleaner and it was back to normal. (Did I mention that I am a bit of a neat freak?)

One mother was kind enough to bring Champagne for mimosas and I provided bagels and cream cheese with smoked salmon. We had a civilized time exchanging some of the most delicious homemade cookies while the kids completely went nuts with the cookies. Everyone left after two hours, pleased with their cookies and I got to spend the whole day nibbling cookies rather than eating real food.

Ah well, it's Christmas and I got what I wanted - a variety of Christmas cookies and some fantastic memories. Can't say I'd do this again, but then again, there is always next year...


Monday, December 19, 2011

Christmas wishes


Things I hope I can pull off for Christmas this year:

1) Make a strata on Christmas Eve so we can throw it in the oven on Christmas morning to snack on all day.

2) Have all my ingredients mise en place for our traditional Gingerbread Waffles on Christmas morning.

3) Have all the kids presents wrapped and ready to be put under the tree before Christmas Eve. (Hey a girl can dream, right?)


Things I plan to do between the week of Christmas and New Years:

1) Finish the felt circle garland that I started last year but never finished. Absolutely adorable on our tree (in concept) but I only made it about 6 feet long, so it looks kind of pathetic.

2) Finally (!!) make the yarn wreath that I have been admiring for three years. Who knew Starbucks would be a source of inspiration? I have all the supplies and it just needs to be done. So cute.

3) Make a hanging book display for both kids.


Things I wish I had done this year for Christmas:


1) Get the advent stocking garland up and filled on December 1 for the kids. I usually end up getting it up around the second week of December. This year I didn't get it up at all. Did they notice? Nope.

2) Make snow globes. I saw this idea and want to do one for each of my kids for every year they've been around. It'd be fun to see how they have been growing through the holidays.

3) Bigger cookie exchange next year. This time without the kids and more friends. While I loved the cookie decorating party, I'd rather sit back with mimosas and friends and enjoy looking at the pretty cookies. And have some bacon, too.

4) Salt dough ornaments - I loved making these at Halloween and these would be great ornaments for the kids to make for the tree.

5) Make these for friends next year. I am going to start looking for nice white mugs at thrift stores this year to make them.
6) Bought a rubber address stamp for addressing our Christmas cards. Doesn't seem like non-profits are sending out those pre-printed sticker address labels anymore. Maybe it's because we aren't giving them as much as we used to. Ah well. You give and you get.

Tuesday, December 6, 2011

It's a Christmas Miracle!


Anytime we go to Mitchell's Ice Cream, we get ready for a long wait in line, but it's always with the nicest folks who are as happy as we are to get a scoop of San Francisco's best ice cream. During the year, we only go for a scoop here and there but at Christmas-time we throw our waistlines to the wind and buy a 1/2  gallon of Peppermint Candy Ice Cream to eat whenever we want... AT HOME! Waiting for your dinner to finsh cooking? Have a spoonful of ice cream. Wanting something sweet and just don't know what you want... have a bowl of ice cream. Need a drink of water? Have some ice cream. It's that easy.

Talk about traditions. This 1/2 gallon of ice cream is a tradition right up there with anniversaries and birthdays. Yet we always regret it when we finish that huge carton of ice cream. We swear like rehabbing junkies that we'll just get scoops and not a 1/2 gallon of ice cream. Then fast forward 365 days and there we are standing in line with the rest of the city, eagerly buying our 1/2 gallon of fatty, delicious ice cream. If you ever come to San Francisco, please put it on your list of things to do. Well worth the calories.

Saturday, November 26, 2011

Traditions

This is my first guest blog entry and I am so excited to share it with everyone. Emma created an incredible childrens book database and writes reviews about the books that she comes across on her many trips to the library and around the city. She is also a close friend that I have mentioned here and there on this blog. So you can imagine my delight when she took the time to write about something that I think is perfect for this time of year and one that we certainly hold near and dear to our hearts in this family. Traditions.

For the record, it was Emma who inspired us to make cracked Dungeness crab a December tradition. Now if I can just convince my husband and son to get out there and catch a few crabs at 4 in the morning on the pier in Pacifica, we'd be set for the entire month. Take it away, Emma!


Tradition. It’s one of the things we strive to both maintain and create as we make our way through our stressful, scary lives. The stakes rise after you have kids. You so desperately want to be the kind of person who writes into parenting magazines saying, “Every December, we have a sleepover in the living room the first night we put up the Christmas tree,” or, “My kids and I have made this same cookie every December since the year they were born.” I remember sitting in a baby group when my son was one month old and the moderator asked, “What traditions would you like to create as your children grow?” I was panic-stricken as we moved around the room. I think I mumbled something lame like, “Uh, I plan to make them a great birthday cake every year.” Because that’s the thing about traditions: you can’t predict them. They have to evolve organically, grow by themselves from the messy bit parts that make up your day-to-day life.

With nothing, of course, is tradition more entwined than with food. Again, here I have major tradition envy. I remember my dear friend Amanda, she of this very blog, telling me that their family makes gingerbread waffles every Christmas morning. I think our Christmas morning breakfast is a last-minute pulling-things-out-of-fridge as we drag ourselves from our beds after having been up till midnight stuffing stockings. When she told me, I had a momentary thought of stealing her tradition, but I knew it wouldn’t stick. Again, you can’t force tradition.

I tend to think of myself as more spontaneous (read: disorganized) than tradition-bound, by nature. But of course, when I stop and look closely at my life, I see that we have traditions, too. Because I’m close to them, they may not be as clean and pretty as the two-liners I read about in magazines and on blogs. In all their real-life disarray, here are some of the food traditions that bring joy to my own life:
  • The Bûche de Noël yule log cake that I make every Christmas alongside my mom. Part of the tradition is, every darn year, forgetting which of the gazillion recipes out there we usually use, and frantically paging through cookbooks and trawling the Internet to find the right one. 
  • My husband roasting chestnuts. I love this tradition because he does all the work.
  • The scones my mom learned to make living in Scotland when I was a baby. The scones are more biscuit-like than the bakery ones we’re used to here, and I love how they’re baked in a round and cut into wedges.
  • Cracked Dungeness crab at the holidays, usually just twice because it’s so expensive.
  • My aunt’s homemade yeast rolls. The recipe comes from her grandmother, my great-grandmother, and we have never had a holiday dinner without them. Hot from the oven and smothered with butter, they are, hands-down, the best thing on the table. (Recipe below!)
  • My parents’ food-crazed yellow Labrador Retriever stealing at least one precious food item a year. When my son turned three and my mom baked him a cake in the form of the first letter of his name, guess who wolfed the whole thing behind our backs? Rosie. One Easter eve the dog gulped down ten hard-boiled eggs, shells and all. And one Christmas we bought an expensive Panettone for my aunt who was just back from Italy. Rosie ate it. But it’s okay—the story will last longer than the memory of the Panettone would have.
  • Abalone, mussels, and halibut, all courtesy of my fisherman brothers. Never am I so proud to live on the northern coast of California as when I am with my family table feasting on local seafood, plucked fresh from the brine just hours before.
  • Eggnog, the day after Thanksgiving. Irish coffees on Christmas morning with my in-laws. Wine at any hour with my friends. My brother’s homemade beer. Charles Shaw red (hey, we served it at our wedding!). Rosé with my husband in the summer. A glass of sparkling wine in the lobby of the Hyatt every Christmas season, as my kids go nuts around me. These are some of the little things that give my life a twinkle.
  • And lastly, lest you think me a snob, a bag of potato chips, a diet soda, and a beef jerky on road trips to see Grandma up north. There’s a time and a place for everything.
 What are your food traditions?


Grandma Katherine's Rolls
I'll make the rolls for a dinner with our families sometime. They're so soft and yeasty--basically fresh-baked white bread in muffin form.
4-5 cups flour
1Tablespoon salt
1 1/2 Tablespoons sugar
1/4 cup shortening
1 package dry yeast
1 3/4 to 2 cups warm water
vegetable oil
Sift four cups of the flour, the salt and the sugar into a large bowl. Mix shortening into flour mixture with fingers. Make a hole in the middle, put yeast in, add about half of the water, and mix until dissolved. Add remaining water and mix thoroughly. If dough is too sticky, add a little of the remaining one cup flour. Dough should be quite soft. Put some vegetable oil on top, cover, and let rise in warm place for about two hours. Form into rolls with oiled hands, set into muffin tins, and let rise another 1-2 hours. Bake at 450 for about ten minutes, until tops are lightly browned. Eat instantly with butter!

Tuesday, November 1, 2011

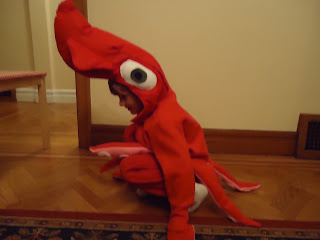
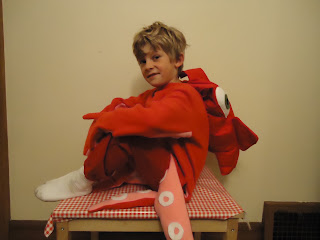
Handmade Halloween - the squid edition

**Updated! My son's costume won a dubious (yet loving) award at SFGate's The Poop. Check it out!

Halloween is my holiday. I can do without the hard boiled eggs at Easter, the roasted turkey at Thanksgiving and the figgy pudding at Christmas... but give me orange and black and pumpkin decorations and I am a happy girl. From October 1 -31 I am in a mad dash to get it all in - the pumpkin muffins, pumpkin pancakes, pumpkin waffles, pumpkin patches, fall festivals, apple picking... the whole thing. It is like I am a manic fall freak for 31 days a year and then I calm down and go back to normal.

This year my son wanted to be a red squid. He decided on this after taking this picture of one at the California Academy of Sciences.


I loved the idea of making this costume and my head was spinning with ideas. I could have gone the whole "cut up a sweatshirt" route, but I knew I could do better than that. So I started searching around on flickr and came across this amazing costume.
                                                    (Photo courtesy of Lucy Lou via flickr)

My son took one look at this and said, "That's it!" Great! (Pause) Now how do I make it?

I searched around and found the original creator's blog and posted a comment about what an amazing costume it was and did she have any advice on how to recreate it? She never replied and maybe that was for the best because I was left to figure it out on my own. Sometimes the best results come from just winging it. By studying the photos on flickr, I could see the construction of the costume and went to work. I drew my pattern pieces on brown paper grocery bags and tinkered with the size of the squid head. I made a mock up with some leftover red felt that was passed on to me from a friend. After sewing it together, I kept thinking it looked sort of off, maybe a little strange. I took a few steps back from the table and it hit me, my squid head looked  phallic. Oh dear. So I ripped it all out and tried it again two more times and on the third try I hit pay dirt and stuffed that squid head with batting.

Knowing my son wouldn't wear it if it were made out of scratchy felt I ordered soft pink and red fleece online. I attached the head to the the rest of the body of the squid which was made by tracing one of his hoody sweatshirts onto the fleece fabric for the arms and body. I then then lined the inside of the tentacles and arms with pink fleece and sewed it together like a traditional shirt. And a Halloween costume would not be complete without the use of a glue gun so I attached the suction cups onto the tentacles and viola...a squid was born.

In honor of Lucy and Nora (the squid creator extraordinaire), my son happily posed just like Lucy did in her squid costume. Thank you to the both of you for such great inspiration. We will likely never meet in person, but you inspired us and we thank you for it.


Wednesday, September 7, 2011

SAHM Chronicles: Babysitting swap

It took my friend about four hours to process that I was going to be home for the next 6 - 8 weeks before she suggested a weekly babysitting swap. We did our first swap today where she took my daughter for three hours while I went to the paint store (lofty plans to paint the interior trim of our house while I am on leave) and did a few other errands that are tough to do with a two year old in tow. But the most indulgent part of those three hours? Buying these two magazines


Friday, July 8, 2011

Mom Camp

We just finished the final day of Mom Camp 2011 and it was a roaring success. This all started when my friend and I were complaining about the cost of summer camps and we hatched a plan to host our own Mom Camp week. Each mom took all of the kids for one day and earned herself four days off in return and let me tell you, it saved us all a boatload of money. One week of Zoo Camp in San Francisco is $350 per week from 9-4 pm each day! Mom Camp cost me $30 for park and museum fees - for an entire week of camp. Color me satisfied.

It was harder than we realized to find parents that would want to do this kind of camp, it does take a certain kind of person. One friend with two children of her own told me rather bluntly, "I really don't want to watch other people's kids for long periods of time." Fair enough. A few other friends had vacations planned during the time slots we had selected, but in the end we found two other amazing moms to do this camp with and here is how we did it.

The rules were fairly simple, hours were 9-3 pm each day, no siblings could come to Mom Camp but the host mother could have both of her own kids present at camp when she was hosting and the kids all wore the same shirt (red) so we could easily find them in a crowd. I also suggested that everyone bring their own lunch to Mom Camp each day so picky eaters could get what they wanted (or didn't want), but the other three mothers just made lunch for everyone and it went off without a hitch. However I did ask that parents pack a lunch for their kids on my day because we were going to do a lot of walking and didn't want to have to lug it around. Not fun. Here is how the week turned out.

Monday, July 4th - No Mom Camp

Tuesday, July 5th - Strawberry picking in Half Moon Bay. This mom took four six year olds and her 2 year old to Swanton Berry Farms where they picked strawberries, hiked around a reservoir and enjoyed a picnic lunch. The strawberries were surprisingly affordable about $20 total for all of the kids combined. (This was another unsaid rule - the host parent pays for fees, etc.) It was so successful that she got home with barely 30 minutes to spare before camp was over.

Wednesday, July 6th  - Hiking around San Francisco. This mom hosted the camp at her house and took the kids on a lengthy nature hike around Mt. Davidson, took the kids to a local park, served lunch at her house and then let the kids play in the house and backyard.


Thursday, July 7th - Craft Camp. This mom is incredibly crafty and she had a number of projects lined up for the kids to work on throughout the day. She had them the painting with apples on a canvas backpack, making their own bird feeders with half gallon milk jugs and planted their own take home corn seedlings. They took an uphill hike to a park, ate lunch outside and picked berries in the yard.


Friday, July 8th - Coyote Point Camp. I drove the kids down to Coyote Point Museum in San Mateo for the day. We ate a snack at the picnic tables, walked around the museum for an hour, ate our lunches while watching the zookeepers feed the otters. Then we took a long walk down to the peninsula and looked for sharks in the bay, watched airplanes coming in for a landing at San Francisco International Airport, had another snack break before heading over to Magic Mountain Park for some playtime. Then it was back to my house for popsicles and lemonade. 


Every single day was a great adventure for the kids and while I am beyond exhausted, I am giddy with excitement at how well this went. I am hoping we can make a yearbook to document what a success this was for the moms and the kids. My son came home everyday with stories or projects and best of all, the cost was minimal. Next year I want the fathers to get involved, maybe they could host a Dad Camp in the beginning of the summer and the Mom Camp at the end of the summer. It'd be so great to eek two weeks of essentially free camp out of the summer!

Tuesday, July 5, 2011

Tart Cherry Ice Cream on the cheap

There are so many things that I love about the King Arthur Flour Company and their catalog. When the catalog comes in the mail, I find myself lusting over products that I don't need or have room for (whatever happened to using a good old fashioned oven for your cupcakes??). However, it is the K.A.F. recipes that I love, but majority of them require ingredients from their line of products. After swooning over the Tart Cherry Ice Cream recipe, I knew it was going to be a budget buster with their ingredients. I made a few simple swaps that took the cost of this recipe from $38 (with shipping) to $6 for a 1/2 gallon of ice cream. 

I used my trusty Kitchen-Aid Ice Cream maker attachment to make this ice cream. I froze the bowl for 24 hours and also chilled the cherry ice cream base for 24 hours to let the flavors meld. The ice cream was too tart when I finished mixing it together, but the flavor mellowed and wasn't so harsh after sitting in the fridge overnight.


The original recipe is here, and below are my changes.

Tart Cherry Ice Cream on the Cheap

1 bottle of Trader Joe's Tart Cherry Juice
1 1/2 cups heavy cream
1 cup whole milk
3/4 cup sugar
1/4 cup vanilla instant pudding (I used the Jell-O brand)

In the original recipe, K.A.F. has you use their special $17-for-16 oz. cherry juice concentrate, but that would make this recipe too expensive for me. The recipe writers suggest using frozen cherry juice concentrate as a substitution, but I couldn't find it at my local grocery stores. In a pinch I figured that Trader Joe's cherry juice would make a fine substitution.

In a saucepan, slowly simmer 2 cups of cherry juice (you will want to see tiny bubbles at the edges and avoid boiling), and reduce it down to about 3/4 cup of juice, about the consistency of maple syrup. I ended up having to do this twice because I got distracted and wandered off only to come back to a huge sticky mess that boiled over onto my stove top. Let the syrup cool in the fridge.

The recipe writers do make one thrifty suggestion that I actually used. Rather than buy their pastry mix for $9, they said that vanilla instant pudding would be a fine substitute. In a bowl, whisk together, the heavy cream, milk, sugar and 1/4 cup of the vanilla instant pudding powder. Add the cherry syrup and whisk till combined. Refrigerate for at least 2 hours or overnight. Then follow your manufacturers instructions for your ice cream maker.

Using my KitchenAid attachment, I mixed it at Level 1 and it came together in a frosty, custard-like consistency in about 20 minutes. Freeze it for at least two hours so that it can "ripen." It scooped out beautifully and I topped it with some chopped Trader Joe's bottled morello cherries. Next time I will reserve a little cherry syrup to drizzle over the top.